Wednesday 7 May 2014

Tilt shift

Tilt shift photography

What is it?
  Tilt–shift photography is the use of camera movements on small- and medium-format cameras, and sometimes specifically refers to the use of tilt for selective focus, often for simulating a miniature scene.
Miniature faking vs. Tilt Shift?
  Miniature faking, also known as diorama effect or diorama illusion, is a process in which a photograph of a life-size location or object is made to look like a photograph of a miniature scale model. Blurring parts of the photo simulates the shallow depth of field normally encountered in close-up photography, making the scene seem much smaller than it actually is; the blurring can be done either optically when the photograph is taken, or by digital postprocessing. Many diorama effect photographs are taken from a high angle to simulate the effect of looking down on a miniature. Tilt–shift photography would be different in the way in which the process is created and made to look smaller, yet miniature faking adds an effect of a blur on to the image creating a 'miniatue fake'.

Equipment needed?
  • 24 mm lens that tilts
  • 35 mm lens that shifts
  • Camera

The process?
  Tilt–shift encompasses two different types of movements, rotation of the lens plane relative to the image plane, called tilt, and movement of the lens parallel to the image plane, called shift. Tilt is used to control the orientation of the plane of focus and hence the part of an image that appears sharp. Shift is used to adjust the position of the subject in the image area without moving the camera back; this is often helpful in avoiding the convergence of parallel lines, as when photographing tall buildings.
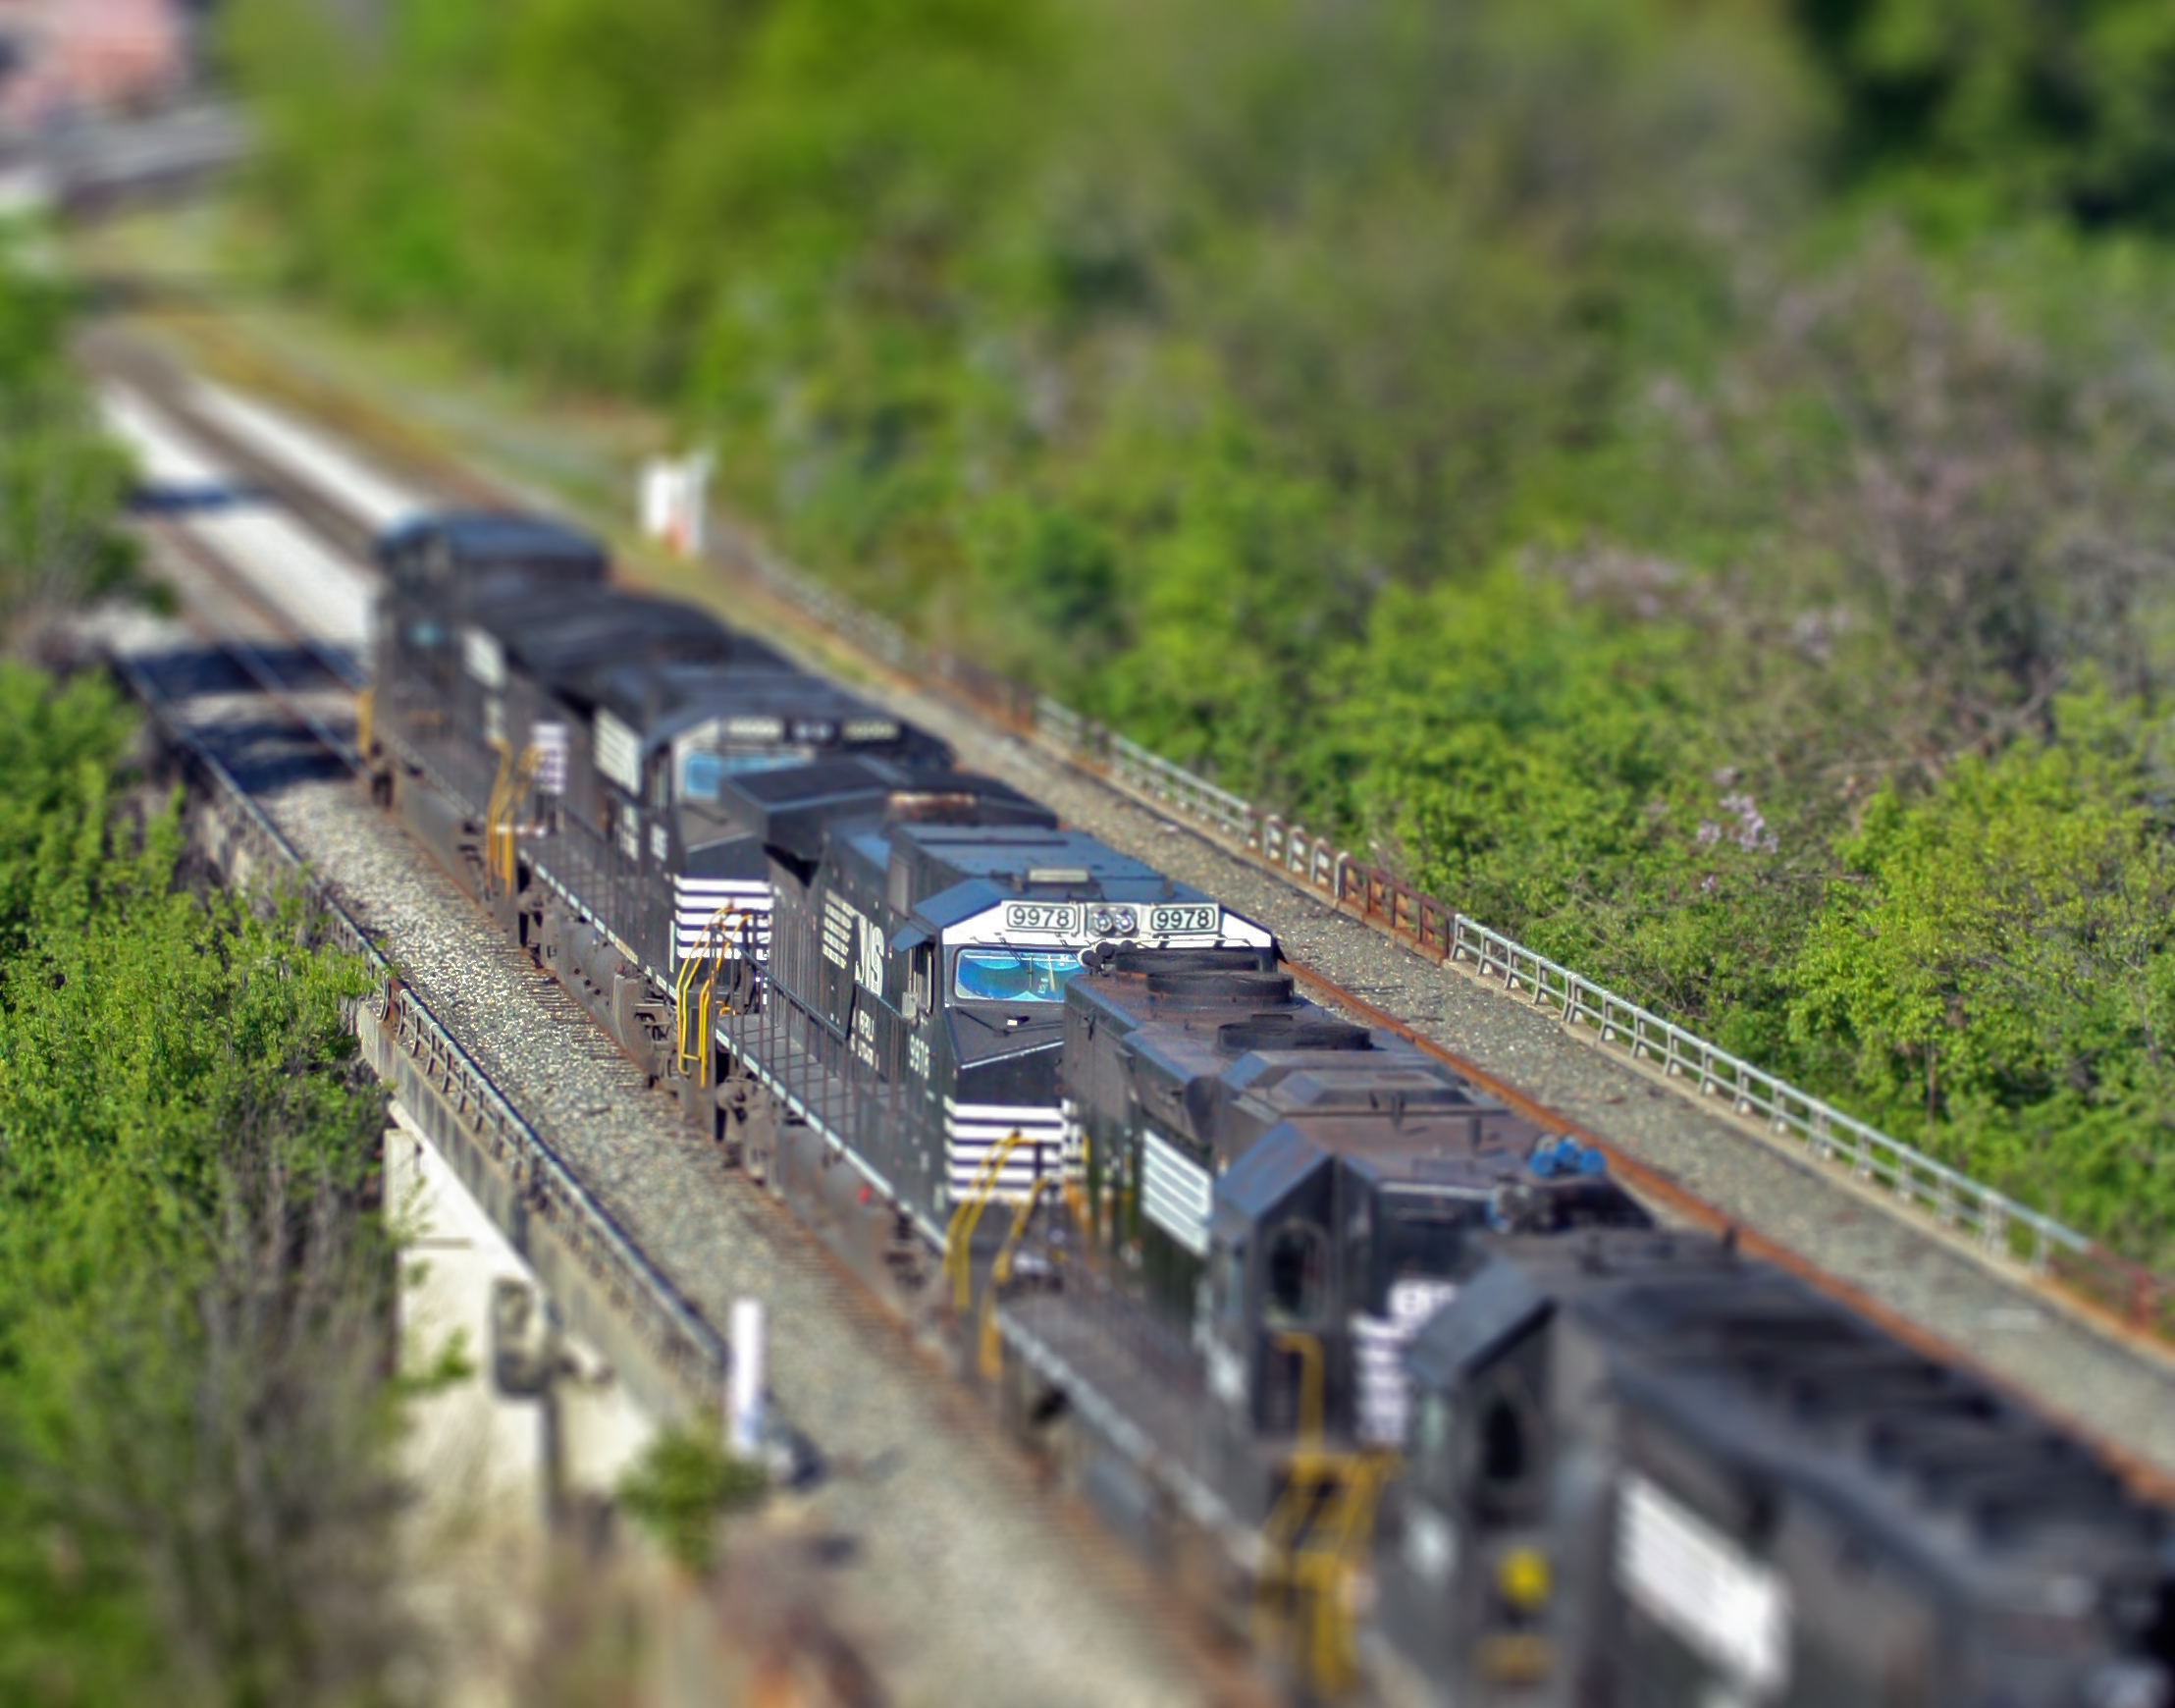
  By doing this, is creating a simulating miniature scene.
Ideas?


My images

Scanography

Scanography

 Scanography, more commonly known as scanner photography. This is the method of using a flatbed photo scanner in order to capture digital images, and creating printable art. With the depth of field on a scanner being very poor, yet the advantage can be seen within the sharpness and colour saturation. 
  This photography is a very simple technique, as all that is needed is a scanner which has a usb lead in order to plug the scanner into a computer/laptop in order to view the image once scanned. I simply set this up with a flatbed photo scanner, plugged into my macbook allowing me to view my scanned images straight away. 

Ideas for my scanography images


  For my scanography images, I like the idea of a vintage style photograph of a girl with her hair across the scanner and only showing part of her face (like the two images that can be seen in the middle above). These images look good with flowers placed lightly around them, or around their hair. I think I will apply this vintage style imagery to my photos, as it is different to anything I have done in this unit and will therefore explore my skills and development within the unit.
  I also really like the idea of the skull around to flowers and greenery, I feel this gives a sense of life and death. As the skull portrays death and the greenery portrays the life in the image, this contrast adds great power and strength to the image making it stand out dramatically.

My scanography
I kept to my ideas, and here are some of the scanography images I made in class. 


High Speed Photography

High Speed Photography

What is it? 
High Speed Photography is the science of taking images of very fast moving subject material. This type of photography captures things which are normally invisible to the human eye. On one hand, high speed photography can be used to capture an apple falling into water capturing the splash of the water. However, there is also the high speed photography of which is almost created into a video to show the fast movement of a frame of images. 

History
In 1872, the former governor of California Leland Stanford, a businessman and race-horse owner, hired Eadweard Muybridge for some photographic studies, of the movement of a race horse. After completing this study, Stanford then wanted a study of the horse at a gallop. Muybridge planned to take a series of photos on 15 June 1878 at Stanford's Palo Alto Stock Farm. He placed numerous large glass-plate cameras in a line along the edge of the track. The path was lined with cloth sheets to reflect as much light as possible. He copied the images in the form of silhouettes onto a disc to be viewed in a machine he had invented, which he called a zoopraxiscope. This device was later regarded as an early movie projector, and the process as an intermediate stage toward motion pictures or cinematography. Here is the photography done by Muybridge with his zoopraxiscope in 1878. 


How is it done?
The main requirements in order to create high speed photography are:
  • A sensitive sensor
  • Good shuttering system
  • Fast strobe light
You can't just point a lens at an object and hope your picture will turn out. There are two very important factors that determine how film is exposed to light:
  • How much light enters through the lens
  • The amount of time the film is exposed to light

    The device that works with the aperture and determines the second factor, how long the film is exposed to light, is called the shutter. The shutter is basically a curtain that opens and closes to expose the film to light. More specifically, it's the shutter speed -- the rate at which the shutter opens and closes -- that really affects the film's exposure.
    The first factor, the amount of light coming onto the film, is controlled by the camera's aperture, which is a circular opening that can expand or shrink in size. The aperture works when you need to let in more light, the circle becomes bigger; when you need to block out some light, the circle becomes smaller. Once this is the case the image can be shot showing the movement, and creating high speed photography. 

My high speed photography images
Me and my classmates set up the photography studio in our college in order to capture some high speed photographs. We used a big bowl of water, while dropping fruit in to the water in order to create movement. We then captured this movement with a Canon 600D, here are some of my images.


Friday 7 March 2014

Three point lighting

  Three-point lighting is a standard method used in visual media such as video, film and still photography. By using three separate positions of light, the photographer can illuminate the shot's subject however desired, while also controlling the shading and shadows produced by direct lighting.


Key Light
This is the main light. It is usually the strongest and has the most influence on the look of the scene. It is placed to one side of the camera/subject so that this side is well lit and the other side has some shadow.

Fill Light
This is the secondary light and is placed on the opposite side of the key light. It is used to fill the shadows created by the key. The fill will usually be softer and less bright than the key. To acheive this, you could move the light further away or use some spun. You might also want to set the fill light to more of a flood than the key.
Back Light
The back light is placed behind the subject and lights it from the rear. Rather than providing direct lighting (like the key and fill), its purpose is to provide definition and subtle highlights around the subject's outlines. This helps separate the subject from the background and provide a three-dimensional look.

  Here are some images I have captured with the use of three-point lighting set up:


  On both these images you can tell I have used the three-point lighting set up to some extent. On the first image, to the left, you can see that I have placed a key light over the top of her head as well as the fill light, creating the darkness towards the bottom of the image in order to create a difference. On the same image, I also used a back light facing the backdrop of the image in order to create the lightness of her hair and add to the detail. In the second image, to the right, I have used the three-point lighting in the same way in which is shown on the diagram above in order to create a standard three-point lighting portrait. 

Low, High, Mid Key Lighting Stages


Low Key Lighting
  A Low Key Lighting set up is shown in the image to the right, a simple set up yet creates a great lighting effect on the subject for the image. The subject stands with a black background, with one light to either the left or right side of them, depending on where the light is wanting to be situated in the image. The subject will face the light or the camera, of which the camera will be in front of them, in order to create a half light, half dark image. Here is an image I have created in this way:


  Furthermore, there are more ways in which you can use Low Key Lighting in order to create different effects within the portraiture. One of this ways could be to capture a silhouette of the subject, by placing the light to either the far side of the right or left of the subject. You would then place the camera to the opposite side of the subject, allowing you to take the photo and create a silhouette. Here is an example of one of my silhouettes, when using Low Key Lighting: 


  However, you can also create a full detailed image within the use of Low Key Lighting. This is done by placing the camera straight in front of the subject, with then having the light source next to the camera as so the light is also almost straight in front of the subject. By doing this, you allow the light to shine on the subjects fully allowing much more detail than the previous two photos, yet with keeping the complete black background. Here is an image I took myself in this way:


Mid Key Lighting
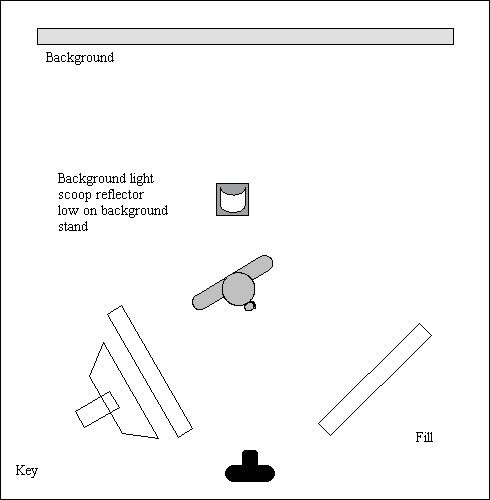
  A typical Mid Key Lighting setup can be seen to the right of this photography. However, being more advanced as in my lighting set up I did not use a reflector just with the camera and light angled in at each other at the front of the subject. The subject will stand against a white background, with the camera and lighting source angled to each the left and the right of it, in front of it. This type of lighting set up allows the camera to create a soft look to the subject, with an almost glowing background. These 3 stages of lighting are all used in effect to create a mood to the image, because of the white, dark and glowing effects they can create certain moods and feelings towards the audience. Here are some images I have created using this Mid Key lighting set up:


High Key Lighting
  A typical High Key Lighting set up can be seen to the right, where the subject is the black dot in the middle of the set up with a white backdrop behind them. Close to the backdrop will be two smaller lights, covered by a white 'flag' of with reduces the light getting to the subject but focuses on the light of the backdrop, creating a clean white cut. Meanwhile, the camera is situated right in front of the subject of which two more further lights are placed at either side of which work together in order to expose the subject. The idea of High Key Lighting, is to expose the subject in order to create a fresh image of them which includes great detail and a good use of lighting source. Here are some images I have captured using this lighting set up:


Panorama Planet

After creating some panorama images, I then began to work on panorama planets. To begin with I researched this type of photography, and finding out what a panoramic planet would look like. Here are some I found on Google images:


I then found some landscape images on Google of which I could use to create my own panoramic planets. Making sure they have 25% of the sky and 25% of the floor with the remaining 50% being the detail of the image. Once I had opened the image onto Photoshop, I then changed the image height making the height the same size of the width which stretches out the image making it square. I then clicked on the filter tab, and selected polar coordinates on the distort tab. This then transforms the chosen image into a circle, creating a panorama planet. 

Here are some of the panorama planets I have created: 


Friday 7 February 2014

Panorama

Panoramic Photography

Who invented panoramas? 
  One of the first recorded panoramic photographs was by Joseph Puchberger, in Austria 1843. This was a hand-cracked, 150° field of view, 8-inch focal length camera that exposed a relativity large Daguerreotype which was 610 mm long. Here is the image:


This technology was further developed by Kodak, which revealed the worlds first panoramic camera in 1899, Model No. 4. 

What are they used for? 
  They are lots of uses for panoramic photographs, and now with the technological convergence of panorama apps on mobile phones people can now take panorama images on there phones whenever and wherever they want to. 
  Also, people who go travelling also like to create panoramic images in order to show the people at home. Examples of this can be found on gigapixel.com, where images can be found from all over the world. These panorama's are enabled to let the audience zoom in and move around the image to explore the space is which the image has been taken. 
  Panorama's are most commonly used for to capture scenes of landscapes of natural beauty or even city skylines. These are the most common because of the beauty that they can capture though the use of the panorama. 

How are they created and made? What is the technique behind panoramas? 
  One of the best ways to create a panoramic image would be to use Photoshop and Photomerge. This is done by taking your images in line with one other, but as you move to the next image you make sure you overlap the two to creating 1/3 of the image the same in each next sequence to the images. Once your images are taken, you then 'stitch' your image together threw the use of Photoshop and Photomerge. Each image is opened up in Photomerge in the sequence of which the panorama will unfold, where it is then sent to Photoshop in order to blend the images together. If the image becomes uneven you should first flatten your image and then do an Arbitrary rotation until the picture looks level. Once this is done, you can then edit your photo to how you wish. This is known as segmented panorama. 


  There are also lots of other ways of creating panoramic photographers, here are a few examples: 

  • Catadioptric cameras
  • 3D panorama
Catadioptric cameras
  Catadioprtic camera consist of lens and curved mirrors that reflect a 360 degree field of view into the lens' optics. These specific lens and curved mirrors are arranged in order to create a single viewpoint, which means the panorama is effectively viewed from a single point of space. Meaning you can simply warp the acquired image into cylindrical or spherical panorama.   


3D panorama
  Some camera's enabled a 3D format when capturing a panorama image, this technology enables the photographer to take shots from different angles and combine them creating a multidimensional effect. Cameras such as Samsung NX1000 and Sony Cyber-shot DSC-RX1 off the 3D panorama mode. 

Use of panoramas as art from and science

Art form
Panorama is used greatly in art form, as to create the panorama's which can be moved and zoomed in on, as I spoke about earlier in this blog. Examples can be found at http://360gigapixels.com/tokyo-tower-panorama-photo/. These images are taken around the world everyday and are equally interesting to the audience.

Science 

This image from the Apollo 11 shows a man on the moon, this is done extremely well to this experience to others who have not had this scientific experience themselves, which is most people. To see this imagery, we realise just how vastly time and science has moved on as to be able to create such images to see an amazing experience. 
  Also, such panoramic photographs are also use in science as to capture images of nature and such things in order to examine and express. Here are some examples: 


From these panorama's here you can see the different landscapes of which have been captured, these different landscapes are all part of science and evolution over the years which is what makes this type of panoramic photography so interesting and special. 

My panorama images