
Low Key Lighting
 A Low Key Lighting set up is shown in the image to the right, a simple set up yet creates a great lighting effect on the subject for the image. The subject stands with a black background, with one light to either the left or right side of them, depending on where the light is wanting to be situated in the image. The subject will face the light or the camera, of which the camera will be in front of them, in order to create a half light, half dark image. Here is an image I have created in this way:
Furthermore, there are more ways in which you can use Low Key Lighting in order to create different effects within the portraiture. One of this ways could be to capture a silhouette of the subject, by placing the light to either the far side of the right or left of the subject. You would then place the camera to the opposite side of the subject, allowing you to take the photo and create a silhouette. Here is an example of one of my silhouettes, when using Low Key Lighting:

However, you can also create a full detailed image within the use of Low Key Lighting. This is done by placing the camera straight in front of the subject, with then having the light source next to the camera as so the light is also almost straight in front of the subject. By doing this, you allow the light to shine on the subjects fully allowing much more detail than the previous two photos, yet with keeping the complete black background. Here is an image I took myself in this way:

Mid Key Lighting
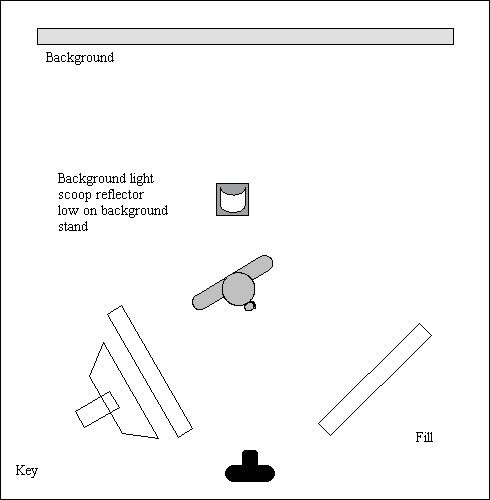 A typical Mid Key Lighting setup can be seen to the right of this photography. However, being more advanced as in my lighting set up I did not use a reflector just with the camera and light angled in at each other at the front of the subject. The subject will stand against a white background, with the camera and lighting source angled to each the left and the right of it, in front of it. This type of lighting set up allows the camera to create a soft look to the subject, with an almost glowing background. These 3 stages of lighting are all used in effect to create a mood to the image, because of the white, dark and glowing effects they can create certain moods and feelings towards the audience. Here are some images I have created using this Mid Key lighting set up:

 High Key Lighting
A typical High Key Lighting set up can be seen to the right, where the subject is the black dot in the middle of the set up with a white backdrop behind them. Close to the backdrop will be two smaller lights, covered by a white 'flag' of with reduces the light getting to the subject but focuses on the light of the backdrop, creating a clean white cut. Meanwhile, the camera is situated right in front of the subject of which two more further lights are placed at either side of which work together in order to expose the subject. The idea of High Key Lighting, is to expose the subject in order to create a fresh image of them which includes great detail and a good use of lighting source. Here are some images I have captured using this lighting set up:


No comments:
Post a Comment