Friday 7 March 2014

Three point lighting

  Three-point lighting is a standard method used in visual media such as video, film and still photography. By using three separate positions of light, the photographer can illuminate the shot's subject however desired, while also controlling the shading and shadows produced by direct lighting.


Key Light
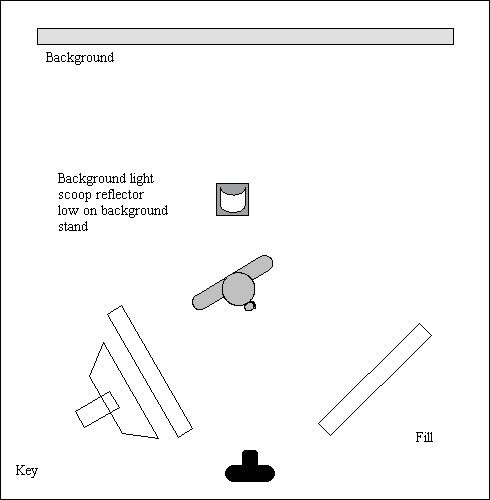
This is the main light. It is usually the strongest and has the most influence on the look of the scene. It is placed to one side of the camera/subject so that this side is well lit and the other side has some shadow.

Fill Light
This is the secondary light and is placed on the opposite side of the key light. It is used to fill the shadows created by the key. The fill will usually be softer and less bright than the key. To acheive this, you could move the light further away or use some spun. You might also want to set the fill light to more of a flood than the key.
Back Light
The back light is placed behind the subject and lights it from the rear. Rather than providing direct lighting (like the key and fill), its purpose is to provide definition and subtle highlights around the subject's outlines. This helps separate the subject from the background and provide a three-dimensional look.

  Here are some images I have captured with the use of three-point lighting set up:


  On both these images you can tell I have used the three-point lighting set up to some extent. On the first image, to the left, you can see that I have placed a key light over the top of her head as well as the fill light, creating the darkness towards the bottom of the image in order to create a difference. On the same image, I also used a back light facing the backdrop of the image in order to create the lightness of her hair and add to the detail. In the second image, to the right, I have used the three-point lighting in the same way in which is shown on the diagram above in order to create a standard three-point lighting portrait. 

Low, High, Mid Key Lighting Stages


Low Key Lighting
  A Low Key Lighting set up is shown in the image to the right, a simple set up yet creates a great lighting effect on the subject for the image. The subject stands with a black background, with one light to either the left or right side of them, depending on where the light is wanting to be situated in the image. The subject will face the light or the camera, of which the camera will be in front of them, in order to create a half light, half dark image. Here is an image I have created in this way:


  Furthermore, there are more ways in which you can use Low Key Lighting in order to create different effects within the portraiture. One of this ways could be to capture a silhouette of the subject, by placing the light to either the far side of the right or left of the subject. You would then place the camera to the opposite side of the subject, allowing you to take the photo and create a silhouette. Here is an example of one of my silhouettes, when using Low Key Lighting: 


  However, you can also create a full detailed image within the use of Low Key Lighting. This is done by placing the camera straight in front of the subject, with then having the light source next to the camera as so the light is also almost straight in front of the subject. By doing this, you allow the light to shine on the subjects fully allowing much more detail than the previous two photos, yet with keeping the complete black background. Here is an image I took myself in this way:


Mid Key Lighting
  A typical Mid Key Lighting setup can be seen to the right of this photography. However, being more advanced as in my lighting set up I did not use a reflector just with the camera and light angled in at each other at the front of the subject. The subject will stand against a white background, with the camera and lighting source angled to each the left and the right of it, in front of it. This type of lighting set up allows the camera to create a soft look to the subject, with an almost glowing background. These 3 stages of lighting are all used in effect to create a mood to the image, because of the white, dark and glowing effects they can create certain moods and feelings towards the audience. Here are some images I have created using this Mid Key lighting set up:


High Key Lighting
  A typical High Key Lighting set up can be seen to the right, where the subject is the black dot in the middle of the set up with a white backdrop behind them. Close to the backdrop will be two smaller lights, covered by a white 'flag' of with reduces the light getting to the subject but focuses on the light of the backdrop, creating a clean white cut. Meanwhile, the camera is situated right in front of the subject of which two more further lights are placed at either side of which work together in order to expose the subject. The idea of High Key Lighting, is to expose the subject in order to create a fresh image of them which includes great detail and a good use of lighting source. Here are some images I have captured using this lighting set up:


Panorama Planet

After creating some panorama images, I then began to work on panorama planets. To begin with I researched this type of photography, and finding out what a panoramic planet would look like. Here are some I found on Google images:


I then found some landscape images on Google of which I could use to create my own panoramic planets. Making sure they have 25% of the sky and 25% of the floor with the remaining 50% being the detail of the image. Once I had opened the image onto Photoshop, I then changed the image height making the height the same size of the width which stretches out the image making it square. I then clicked on the filter tab, and selected polar coordinates on the distort tab. This then transforms the chosen image into a circle, creating a panorama planet. 

Here are some of the panorama planets I have created: